Saturday, June 30, 2012

What Is A Key? Describe Different Types Of Keys Used In Database?,define a relationship,


-A key is a single or combination of multiple fields.

-Its purpose is to access or retrieve data rows from table according to the requirement.

-The keys are defined in tables to access or sequence the stored data quickly and smoothly.

-They are also used to create links between different tables.

Primary Key


The attribute or combination of attributes that uniquely identifies a row or record in a relation is known as primary key.

Secondary key
-A field or combination of fields that is basis for retrieval is known as secondary key.

-Secondary key is a non-unique field. One secondary key value may refer to many records.

Candidate Key or Alternate key


-A relation can have only one primary key.

-It may contain many fields or combination of fields that can be used as primary key.

-One field or combination of fields is used as primary key.

-The fields or combination of fields that are not used as primary key are known as candidate key or alternate key.
-Composite key or concatenate key
A primary key that consists of two or more attributes is known as composite key.

Sort Or control key

-A field or combination of fields that is used to physically sequence the stored data called sort key. It is also known s control key.

Foreign Key


-A foreign key is an attribute or combination of attribute in a relation whose value match a primary key in another relation.

-The table in which foreign key is created is called as dependent table.

-The table to which foreign key is refers is known as parent table.

Comparison with 3tier architecture and MVC(model-view-controller) architecture


Both are smiler but topologically they are different.

-A Basic rule in a three tier architecture is the client tier never communicates directly with the data tier;
-in a three-tier model all communication must pass through the middle tier. Conceptually the three-tier architecture is linear

But


-MVC architecture is triangular

cycle in MVC(model-view-controller)

-view sends updates to the controller,

-the controller updates the model, and

-the view gets updated directly from the model.


3tier architecture and Multitier architecture


multi-tier architecture (often referred to as n-tier architecture) is a

client–server architecture in which

the presentation,
the application processing, and
the data management


are logically separate processes

The most widespread use of multi-tier architecture is the three-tier architecture.

There should be

a presentation tier,
a business or data access tier, and
a data tier.


Three-tier architecture


It was developed by John J. Donovan

The three-tier model is a software architecture and a software design pattern.

a change of operating system in the presentation tier would only affect the user interface code.


Presentation tier


-This is the topmost level of the application.

-The presentation tier displays information related to such services as browsing merchandise, purchasing, and shopping cart contents.

-It communicates with other tiers by outputting results to the browser/client tier and all other tiers in the network.

Application tier (business logic, logic tier, data access tier, or middle tier)

-The logic tier is pulled out from the presentation tier and, as its own layer, it controls an application’s functionality by performing detailed processing.

Data tier


-This tier consists of database servers.

-Here information is stored and retrieved.

-This tier keeps data neutral and independent from application servers or business logic. Giving data on its own tier also improves scalability and performance.


Data transfer between tiers is part of the architecture.

Protocols involved may include one or more of SNMP, CORBA, Java RMI, .NET Remoting, Windows Communication Foundation, sockets, UDP, web services or other standard or proprietary protocols.

Often middleware is used to connect the separate tiers.

Wednesday, June 27, 2012

Create PDF from DataTable in Asp.net,pdf generator without report viewer,

In this article ,i am explaining you how to create pdf file from datatable.i am passing a datatable in this function and code to convert this in pdf file. I am using iTextSharp you can download it from internet. it is free. you need to create a simple asp.net page and get data from database.Then pass it to ExportToPDF method. We can set PDF page margins, change page orientation (portrait, landscape), customize headers and footers add page numbers and more.Do some R & D with iTextSharp.
public void ExportToPdf(DataTable myDataTable)  
   {      
     Document pdfDoc = new Document(PageSize.A4, 10, 10, 10, 10);  
     try  
     {  
       PdfWriter.GetInstance(pdfDoc, System.Web.HttpContext.Current.Response.OutputStream);  
       pdfDoc.Open();  
       Chunk c = new Chunk("" + System.Web.HttpContext.Current.Session["CompanyName"] + "", FontFactory.GetFont("Verdana", 11));  
       Paragraph p = new Paragraph();  
       p.Alignment = Element.ALIGN_CENTER;  
       p.Add(c);  
       pdfDoc.Add(p);  
       string clientLogo = System.Web.HttpContext.Current.Session["CompanyName"].ToString();  
       clientLogo = clientLogo.Replace(" ", "");  
       string clogo = clientLogo + ".jpg";  
       string imageFilePath = System.Web.HttpContext.Current.Server.MapPath("../ClientLogo/" + clogo + "");  
       iTextSharp.text.Image jpg = iTextSharp.text.Image.GetInstance(imageFilePath);  
       //Resize image depend upon your need   
       jpg.ScaleToFit(80f, 60f);  
       //Give space before image   
       jpg.SpacingBefore = 0f;  
       //Give some space after the image   
       jpg.SpacingAfter = 1f;  
       jpg.Alignment = Element.HEADER;  
       pdfDoc.Add(jpg);  
       Font font8 = FontFactory.GetFont("ARIAL", 7);  
       DataTable dt = myDataTable;  
       if (dt != null)  
       {  
         //Craete instance of the pdf table and set the number of column in that table  
         PdfPTable PdfTable = new PdfPTable(dt.Columns.Count);  
         PdfPCell PdfPCell = null;  
         for (int rows = 0; rows < dt.Rows.Count; rows++)  
         {  
           for (int column = 0; column < dt.Columns.Count; column++)  
           {  
             PdfPCell = new PdfPCell(new Phrase(new Chunk(dt.Rows[rows][column].ToString(), font8)));  
             PdfTable.AddCell(PdfPCell);  
           }  
         }  
         //PdfTable.SpacingBefore = 15f; // Give some space after the text or it may overlap the table            
         pdfDoc.Add(PdfTable); // add pdf table to the document   
       }  
       pdfDoc.Close();  
       Response.ContentType = "application/pdf";  
       Response.AddHeader("content-disposition", "attachment; filename= SampleExport.pdf");  
       System.Web.HttpContext.Current.Response.Write(pdfDoc);  
       Response.Flush();  
       Response.End();  
       //HttpContext.Current.ApplicationInstance.CompleteRequest();  
     }  
     catch (DocumentException de)  
     {  
       System.Web.HttpContext.Current.Response.Write(de.Message);  
     }  
     catch (IOException ioEx)  
     {  
       System.Web.HttpContext.Current.Response.Write(ioEx.Message);  
     }  
     catch (Exception ex)  
     {  
       System.Web.HttpContext.Current.Response.Write(ex.Message);  
     }  
   }  

Tuesday, June 26, 2012

SiteMapPath using asp.net,example of SiteMapPath,with screenshot,why we use


ButtonExample.aspx

  1. <%@ Page Language="C#" %>  
  2. <%@ Import Namespace="System.Drawing" %>  
  3.   
  4. <!DOCTYPE html PUBLIC "-//W3C//DTD XHTML 1.0 Transitional//EN" "http://www.w3.org/TR/xhtml1/DTD/xhtml1-transitional.dtd">  
  5.   
  6. <script runat="server">  
  7.     protected void Button1_Click(object sender, System.EventArgs e)  
  8.     {  
  9.         SiteMapPath1.BackColor = Color.Cornsilk;  
  10.         SiteMapPath1.ForeColor = Color.Crimson;  
  11.         SiteMapPath1.Font.Size = FontUnit.Large;  
  12.         SiteMapPath1.Font.Italic = true;  
  13.         SiteMapPath1.PathSeparator = " / ";  
  14.         SiteMapPath1.NodeStyle.ForeColor = Color.PaleVioletRed;  
  15.         SiteMapPath1.Font.Bold = true;  
  16.         SiteMapPath1.RootNodeStyle.Font.Size = FontUnit.XLarge;  
  17.     }  
  18. </script>  
  19.   
  20. <html xmlns="http://www.w3.org/1999/xhtml">  
  21. <head id="Head1" runat="server">  
  22.     <title>How to set, change SiteMapPath style programmatically</title>  
  23. </head>  
  24. <body>  
  25.     <form id="form1" runat="server">  
  26.     <div>  
  27.         <h2 style="color:Navy">SiteMapPath Example: Style</h2>  
  28.         <asp:SiteMapPath   
  29.              ID="SiteMapPath1"   
  30.              runat="server"  
  31.              >  
  32.         </asp:SiteMapPath>  
  33.         <br /><br /><br /><br />  
  34.         <asp:Button   
  35.              ID="Button1"   
  36.              runat="server"  
  37.              ForeColor="SteelBlue"  
  38.              Text="Change SiteMapPath Style"  
  39.              Height="45"  
  40.              OnClick="Button1_Click"  
  41.              Font-Bold="true"  
  42.              />  
  43.     </div>  
  44.     </form>  
  45. </body>  
  46. </html>  

Web.sitemap

<?xml version="1.0" encoding="utf-8" ?>
<siteMap xmlns="http://schemas.microsoft.com/AspNet/SiteMap-File-1.0" >
  <siteMapNode url="Default.aspx" title="Home"  description="Home Page">
    <siteMapNode url="StandardToolBox.aspx" title="StandardToolBox" description="StandardToolBox Controls">
      <siteMapNode url="AdRotatorExample.aspx" title="AdRotator"  description="AdRotator Example" />
      <siteMapNode url="BulletedListExample.aspx" title="BulletedList"  description="BuulletedList Example" />
      <siteMapNode url="ButtonExample.aspx" title="Button"  description="Button Example" />
      <siteMapNode url="CalendarExample.aspx" title="Calendar"  description="Calendar Example" />
    </siteMapNode>
    <siteMapNode url="DataToolBox.aspx" title="DataToolBox" description="DataToolBox controls">
      <siteMapNode url="ListViewExample.aspx" title="ListView"  description="ListView Example" />
      <siteMapNode url="GridViewExample.aspx" title="GridView"  description="GridView Example" />
    </siteMapNode>
    <siteMapNode url="NavigationToolbox.aspx" title="Navigation Toolbox" description="NavigationToolbox controls">
      <siteMapNode url="MenuExample.aspx" title="Menu"  description="Menu Example" />
      <siteMapNode url="SiteMapPathExample.aspx" title="SiteMapPath"  description="SiteMapPath Example" />
      <siteMapNode url="TreeViewExample.aspx" title="TreeView"  description="TreeView Example" />
    </siteMapNode>
  </siteMapNode>
</siteMap>


Sunday, June 24, 2012

Introduction to XPath for ASP.NET Developers


Tree like representation of an XML Document
In XPath, an XML document is represented as a tree of nodes. There is a parent node with one or more child nodes.

While a node in XPath can be of 7 types; for practical purposes, a node in XPath corresponds to an element or attribute within an XML document.

For example, have a look at following XML document:

<?xml version="1.0" encoding="utf-8" ?>
<userinfo>
 <username admin="true">someUserName1</username>
 <email>xyz@whatever.com</email>
</userinfo>

Following is XPath's tree representation of the above document:
  • userinfo
    • username
      • admin
    • email

Each node is related to the nodes above and below it. In our XML document above, userinfo is root node.

userinfo is the parent of username and email nodes. username and email nodes are siblings.

username and email are children of userinfo node. Similarly, admin is the child of username node.

Selecting Nodes within an XML Document

Now that we understand how elements and attributes are represented as nodes in XPath, we will focus on how to use XPath expressions to select one or more nodes within an XML document.

XPath Expressions
Following are some of the expressions that you can use to select one or more nodes from the XML document above:

/userinfo - Selects the root element.
/userinfo/username - Selects the username node which is the child of userinfo root node.
//email - Selects all the nodes in the document which match the name (email) irrespective of where they lie in the document.
//username[@admin] - Selects all nodes with the name of "username" which have an attribute; "admin".
/userinfo/username[1] - Selects the first username node that is the child of userinfo node.
/userinfo/username[last()] - Assuming userinfo had more than one username child nodes, it will return the last username node that is the child of userinfo node.

Practical Demonstration of XPath Expressions

We will now create a sample XML document and then use XPath expressions to select and display only few nodes from it.

Sample XML Document
Copy and paste following text in a new text file and save it as "sample.xml" in the /App_Data folder of your ASP.NET web application:

<?xml version="1.0" encoding="utf-8" ?>
<article>
 <author isadmin="true">Faisal Khan</author>
 <title>Sample XML Document</title>
 <body>
  <page>This is page #1.</page>
  <page>This is page #2.</page>
  <page>This is page #3.</page>
 </body>
</article>


XPath.aspx ASP.NET Page
Now, we will create the ASP.NET page which will read the above sample.xml file and selectively display its contents using XPath.

Copy and paste the following text into a new text file and save it as "XPath.aspx"
in your ASP.NET web application:


<%@ Page Language="C#" AutoEventWireup="true" %>

<%@ Import Namespace="System.Xml" %>

<script runat="server">
 protected void Page_Load(object source, EventArgs e)
 {
  XmlDocument doc = new XmlDocument();
  doc.Load(Server.MapPath("~/App_Data/sample.xml"));

  XmlNodeList nodes = doc.SelectNodes("/article/body/page");

  foreach (XmlNode node in nodes)
  {
   TableRow row = new TableRow();
   TableCell cell = new TableCell();
   cell.Text = node.FirstChild.InnerText;

   row.Cells.Add(cell);
   PagesTable.Rows.Add(row);
  }
 }
</script>

<!DOCTYPE html PUBLIC "-//W3C//DTD XHTML 1.0 Transitional//EN"
 "http://www.w3.org/TR/xhtml1/DTD/xhtml1-transitional.dtd">

<html xmlns="http://www.w3.org/1999/xhtml">
<head runat="server">
    <title>Using XPath Expressions</title>
    <style type="text/css">
  body { font-family: Verdana; font-size: 9pt; }
  .name { background-color: #F7F7F7; }
    </style>
</head>
<body>
    <form id="form1" runat="server">
    <div>
  <asp:Table id="PagesTable" runat="server" />
    </div>
    </form>
</body>
</html>

We will look into its code a little later, for now when this ASP.NET page was run on my computer, it produced following result (displaying only page elements from the XML file):

Looking into the Code

We learned how to read an XML file and display its contents using XmlDocument class from System.Xml namespace in an ASP.NET page, in previous tutorial. We will focus in this tutorial on how to use XPath expressions to only selectively return the list of nodes we want to display to the user.

protected void Page_Load(object source, EventArgs e)
{
 XmlDocument doc = new XmlDocument();
 doc.Load(Server.MapPath("~/App_Data/sample.xml"));

 XmlNodeList nodes = doc.SelectNodes("/article/body/page");

 foreach (XmlNode node in nodes)
 {
  TableRow row = new TableRow();
  TableCell cell = new TableCell();
  cell.Text = node.FirstChild.InnerText;

  row.Cells.Add(cell);
  PagesTable.Rows.Add(row);
 }
}

We create a new instance of XmlDocument class and make it load our "sample.xml" file. Next, we want to only display the page elements so we use a simple XPath expression; "/article/body/page" to select only the page nodes.

XmlDocument doc = new XmlDocument();
doc.Load(Server.MapPath("~/App_Data/sample.xml"));

XmlNodeList nodes = doc.SelectNodes("/article/body/page");

Next, we iterate through the returned list of XmlNodes and insert its contents in our ASP.NET table. To get the text from the page element in XML file, we use XmlNode.FirstChild.InnerText property.

foreach (XmlNode node in nodes)
{
 TableRow row = new TableRow();
 TableCell cell = new TableCell();
 cell.Text = node.FirstChild.InnerText;

 row.Cells.Add(cell);
 PagesTable.Rows.Add(row);
}

Some More XPath Expressions
Had we only wanted to fetch the first page element from the XML document, what is the XPath expression we should have used? And what if we wanted to return only the last page element?

What is Debug? how to debug the program?


Computer programmers, like everybody else, are not perfect. This means the programs they write sometimes have small errors, called "bugs," in them. These bugs can be minor, such as not recognizing user input, or more serious, such as a memory leak that crashes the program.

Before releasing their software to the public, programmers "debug" their programs, eliminating as many errors as possible.

This debugging process often takes a long time, as fixing some errors may introduce others.

Debugging your windshield at a gas station is much easier than debugging a computer program.

What is DLL(Dynamic Link Library)? Dll file in app_data folder in asp.net visual studio...how it works,how it creates...


Stands for "Dynamic Link Library." A DLL (.dll) file contains a library of functions and other information that can be accessed by a Windows program.

When a program is launched, links to the necessary .dll files are created.

If a static link is created, the .dll files will be in use as long as the program is active.

If a dynamic link is created, the .dll files will only be used when needed.

Dynamic links help programs use resources, such as memory and hard drive space, more efficiently.

Saturday, June 23, 2012

Introduction to XML :xml in asp.net with exampale


XML stands for Extensible Markup Language. An XML document stores data in the form of text. The data itself can be textual or binary. The binary data is not stored as binary data but is first converted to and is stored as text data. Elements and attributes are used in XML document to encapsulate data in a more logical hierarchical fashion.

This tutorial is 1st one in the series of tutorials about XML and ASP.NET:

Sample XML Document

Following is a simple XML document:

<?xml version="1.0" encoding="utf-8"?>
<article>
	<author isadmin="true">Faisal Khan</author>
	<title>Sample XML Document</title>
	<body>The body of the article goes here.</body>
</article>

XML Declaration
All XML documents start with . This tells the XML parser that what is to follow is an XML document. An optional encoding attribute is often added as well.

<?xml version="1.0" encoding="utf-8"?>
<article>
	<author isadmin="true">Faisal Khan</author>
	<title>Sample XML Document</title>
	<body>The body of the article goes here.</body>
</article>


Storing Data in an XML Document
The XML document contains text data that is held in its place by a logical hierarchy of elements. The data in the sample XML document, above, is highlighted below:


<?xml version="1.0" encoding="utf-8"?>
<article>
    <author isadmin="true">Faisal Khan</author>
    <title>Sample XML Document</title>
    <body>The body of the article goes here.</body>
</article>


Elements
All XML documents must have a root element. In our sample XML document, the root element is article. All elements must have a starting tag and an ending tag. The name of the element can be anything you want. But it is recommended to keep the element names short and simple to understand e.g., article, full_name, first_name, etc. If an element name has to consist of two words, it is recommended to insert an '_' (underscore) character in the place of space e.g., first_name for "first name". An element is contained between < and > characters. The ending tag has an additional slash '/' just before the name of the element.

The elements in the sample XML document are highlighted below:


<?xml version="1.0" encoding="utf-8"?>
<article>
	<author isadmin="true">Faisal Khan</author>
	<title>Sample XML Document</title>
	<body>The body of the article goes here.</body>
</article>


Attributes
An attribute is name/value pair within an element that can store further information for an element. It has to be in the format of name="value". In our XML document, isadmin is the name of the attribute within author element, whose value is "true". The attribute in our XML document is highlighted below:


<?xml version="1.0" encoding="utf-8"?>
<article>
	<author isadmin="true">Faisal Khan</author>
	<title>Sample XML Document</title>
	<body>The body of the article goes here.</body>
</article>

Entity References
Certain characters are illegal to be present in data segments of the elements i.e., between element start and end tags. These characters are &, <, >, ', and ". The reason is that they have special meaning in an XML document. As you read above, XML elements and attributes use these characters to encapsulate data. Now what should you do if you want to use these characters as data in an XML document? Well, make use of entity references.

An "entity" is a name/value pair defined in a DTD (Document Type Definition) file. We will learn more about DTD files later. For now, you should know that an entity can be a name/value pair, just like an attribute, which you can define yourself. While attributes are defined in XML documents, entities (1 ore more) are defined inside DTD files. You can define an entity in an XML document using DTD syntax and make use of it later in the data in your XML document using an entity reference who syntax is: &entityName;. This is dynamic

substitution. The XML parser will replace the entity reference at runtime with the value of that entity.

<!ENTITY websiteName "Stardeveloper.com">

Above code defines an entity "websiteName" with the value, "Stardeveloper.com". You can access the value of this entity using an entity reference within your XML document using the syntax &websiteName; as shown below:

<?xml version="1.0" encoding="utf-8"?>
<article>
    <author isadmin="true">Faisal Khan</author>
    <title>Sample XML Document</title>
    <body>This article will be posted at &websiteName;.</body>
</article>


Now that you know what entities are and how entity references can be used to access their values inside the data portions of an XML document, dynamically; you should know that all XML documents can use 5 pre-loaded entity references as given below:
Character Entity Reference
& &amp;
< &lt;
> &gt;
' &apos;
" &quot;
Now, if you want to use any of the 5 special characters as data in your XML document, you can use them using entity references like this:

<?xml version="1.0" encoding="utf-8"?>
<article>
	<author isadmin="true">Faisal Khan</author>
	<title>Sample XML Document</title>
	<body>Now you can use &amp;, &lt;, &gt;, &apos;, and &quot;
 tags as often as you want.</body>
</article>


Reading XML Files with ASP.NET example...XML file call using asp.net


In this tutorial, we will learn how to read the contents of an XML file with ASP.NET.

We will make use of the sample XML file which we created in the previous tutorial (Introduction to XML). We will create an ASP.NET page which reads the contents of this XML file and then displays it to the user.

Sample XML File


Okay, let us get started now. Copy and paste the contents below in a new text file and then save that file as "sample.xml" in the


/App_Data sub-folder of your ASP.NET web application.

you see App_Data after create a new database..

Placing the XML file in /App_Data sub-folder ensures that no one will be able to directly access this file from the web. It will only be accessed by our ASP.NET page which will read and display its contents.

<?xml version="1.0" encoding="utf-8"?>
<article>
    <author isadmin="true">Faisal Khan</author>
    <title>Sample XML Document</title>
    <body>The body of the article goes here.</body>
</article>

Reading the Contents of XML File using XmlDocument class

System.Xml namespace has a class with the name of XmlDocument which we will use to read XML file's contents and display it to the user.

Reading the contents of sample.xml file is as easy as these two lines:

XmlDocument doc = new XmlDocument();
	doc.Load(Server.MapPath("~/App_Data/sample.xml"));


Before we delve ourselves deeper into the code, we should create the ASP.NET page first and study its code later.

Reader.aspx
Copy and paste following code into an ASP.NET page and then save it as "reader.aspx":

<%@ Page Language="C#" AutoEventWireup="true" %>

<%@ Import Namespace="System.Xml" %>

<script runat="server">
protected void Page_Load(object source, EventArgs e)
{
	XmlDocument doc = new XmlDocument();
	doc.Load(Server.MapPath("~/App_Data/sample.xml"));

	XmlNode root = doc.DocumentElement;
	AuthorLiteral.Text = root.SelectSingleNode("author").ChildNodes[0].Value;
	TitleLiteral.Text = root.SelectSingleNode("title").ChildNodes[0].Value;
	BodyLiteral.Text = root.SelectSingleNode("body").ChildNodes[0].Value;
}
</script>

<!DOCTYPE html PUBLIC "-//W3C//DTD XHTML 1.0 Transitional//EN"
	"http://www.w3.org/TR/xhtml1/DTD/xhtml1-transitional.dtd">

<html xmlns="http://www.w3.org/1999/xhtml">
<head runat="server">
    <title>Reading an XML File</title>
    <style type="text/css">
		body { font-family: Verdana; font-size: 9pt; }
		.name { background-color: #F7F7F7; }
    </style>
</head>
<body>
    <form id="form1" runat="server">
    <div>
		<table width="50%" cellpadding="5" cellspacing="2">
		<tr>
			<td class="name">Name</td>
			<td><asp:Literal ID="AuthorLiteral" runat="server" /> 
			<asp:Literal ID="AdminLiteral" runat="server" /></td>
		</tr>
		<tr>
			<td class="name">Title</td>
			<td><asp:Literal ID="TitleLiteral" runat="server" /></td>
		</tr>
		<tr>
			<td class="name">Body</td>
			<td><asp:Literal ID="BodyLiteral" runat="server" /></td>
		</tr>
		</table>
		
    </div>
    </form>
</body>
</html>


When you have properly placed sample.xml file in /App_Data sub-folder and reader.aspx in your web application; you should run the ASP.NET page by accessing it in your browser. On my computer, the ASP.NET page, when run, looked like this:


Now that we have created the ASP.NET which successfully reads and displays the contents of our XML file, we should look at the code which is doing the job.


explain xml in asp.net : where XML is Used?,HOW xml is Use,....XML with an example..


1st.use..

You can use XMl to import data into your system and Export out of the system.

This will make you application easier to interact with other application written in different languages.

It depends on a Developer too, some prefer to bind grid with XML and some choose with objects.

2nd use of XML with Example..

Assume am validating a ZIP code (Server Side) that ensures that the user entered ZIP code is available in my ZIPCodes table in some X database. ( An arbitrary business requirement).

Now assume I have 100,000 customers hitting my website every 2 hrs (not realistic but possible. Consider this scenario for the reasons of explanation).

The database may get hammered 100,000 times every 2 hrs. The database may also need to serve other requests apart from the one under discussion.

So, database is a busy for most of the time.

Presuming that ZIPCodes dont change often or they dont change for ever, I would export the ZipCodes to an XML file and have it somewhere secure as part of the web-application.

Now, the validation is done against the XML file and not the database.

So, we might endup eliminating 100,000 hits to the database, in which case the database is open to serve other requests.

There are other possible uses too! But this should just give you a jist of the power xml has.

What are SSI? ssi in asp.net ...use of SSI?


SSI (Server Side Includes) are directives that are placed in HTML pages,

and evaluated on the server while the pages are being served.

They let you add dynamically generated content to an existing HTML page, without having to serve the entire page via a CGI program, or other dynamic technology.

The decision of when to use SSI, and when to have your page entirely generated by some program, is usually a matter of how much of the page is static, and how much needs to be recalculated every time the page is served.

SSI is a great way to add small pieces of information, such as the current time. But if a majority of your page is being generated at the time that it is served, you need to look for some other solution.

What's the deal with Databinder.Eval and Container.DataItem?


The databinding expression <%# some expression %> is evaluated in the language of the page (VB, C#, etc.) This can have a big impact on the current syntax, so be very careful when you are looking at docs for the language you are using.


Container.DataItem is a runtime alias for the DataItem for this specific item in the bound list.

For a grid which displays 10 rows of data, this is one row from the datasource. The actual type of DataItem is determined by the type of the datasource.

For example, if the datasource is a Dataview, the type of DataItem is DataRowView. If the type of the datasource is an array of strings, the type of DataItem is String.

If the datasource is a collection of strongly-typed objects (for example "Employees" objects), the type of DataItem is Employees.


Each of these cases requires a slightly different databinding expression, with further differences between VB and C#.

In every case, you want the databinding expression to produce a string that can be displayed in the page.


Here are some examples:


Array of Strings:

VB/C# <%# Container.DataItem %>


Field from DataView:

VB <%# Container.DataItem("EmployeeName") %>

C# <%# ((DataRowView)Container.DataItem)["EmployeeName"] %>


Property from a collection of objects:

VB <%# Container.DataItem.CustomerName %>

C# <%# ((Customer)Container.DataItem).CustomerName %>


Non-String property from a collection of objects:

VB <%# CStr(Container.DataItem.CustomerID) %>

C# <%# ((Customer)Container.DataItem).CustomerID.ToString() %>


As you can see the syntax is tricky, especially for C#, which requires explicit casting. So we've provided a DataBinder.Eval() helper method that figures out the syntax for you and formats the result as a string.

It's really convenient, with a couple of caveats:

it's late bound (uses reflection at runtime to figure out the data types), and it only supports basic data types in the fields: string, int, datetime, etc.

You can use Eval instead of DataBinder.Eval in ASP.net 2.0


DataBinder.Eval takes 2 or 3 arguments.

The first arg is the data object to bind to. In the case of DataGrid, DataList and Repeater, Container.DataItem is the single row.

The second arg the string name of the field from the data object you which to display. DataBinder.Eval uses these two pieces of information to work out the rest of the expression syntax.


An optional third argument is a .NET formatting string. DataBinder.Eval will handle a single replacement for {0} only. So the example below:


could be simplified to:


Wrapping DataBinder.Eval in CStr() is unnecessary as the compiler will wrap the statement with a Convert.ToString like this:

control1.SetDataBoundString(0, Convert.ToString(DataBinder.Eval(item1.DataItem, "ID")));


Best of all, the Databinder.Eval syntax is the same for VB and C#.


Thursday, June 21, 2012

Events in asp.net : how to call event in asp.net,how to use event..


ASP.NET is an event-driven way of making web applications.

With PHP and Classic ASP,

you have one file, which is executed line after line, from start to end.

However, ASP.NET is very different.

Here we have events, which are either activated by the user in one way or another. In the previous example, we used the Page_Load method. Actually, this is an event, which the Page class calls when the page is loaded.

We will use the same technique in the next example, where we will add a couple of controls to our simple hello world example.

To make it a bit more interesting, we will change the "world" word with something defined by the user. Have a look at this codelisting, where we add two new controls: A Button control and a TextBox control.

<form id="form1" runat="server">
<div>
    <asp:Label runat="server" id="HelloWorldLabel"></asp:Label>
    <br /><br />
    <asp:TextBox runat="server" id="TextInput" /> 
    <asp:Button runat="server" id="GreetButton" text="Say Hello!" />
</div>
</form>


As you can see, we now have the 2 new controls added, but they really can't do much at the moment.

You can run the example if you wish to check this out for your self - if you click the button, the page is simply reloaded.

Let's change that, and let's start by doing it the easy way.

VWD comes with a WYSIWYG editor, and while I hardly ever use it my self, it does make some things easier, like creating events.

So, click the Design button in the bottom of VWD. Now you will see a visual representation of our page.

We wish to add a Click event to the button, and this is very simply - just doubleclick the GreetButton, and you will be taken to the CodeBehind file of our page.

As you can see, a fine new method has been added, called GreetButton_Click.

If you have a look at the Default.aspx file (you need to go from Design view to Source view), you will see that an attribute has been added to our Button control, telling which method to call when the button is clicked.

All this work done with a simple doubleclick.

Now lets add some code to our new event. We wish to use the text from the TextBox, on our good old Label with the "Hello, world!" text. This is also very simple, and all it requires is a single line of code:

HelloWorldLabel.Text = "Hello, " + TextInput.Text;


Run the project again (F6), and you will see the our old page with a couple of new controls. The "Hello, world!" text is still there, because we set it in the Page_Load event.

Now try entering a name in the textbox, and press the button. Voila, the text is changed, and we have just used our first control event.

Notice how we can add code which is not necessarily called unless the user performs a specific task. This is different from the good old Classic ASP/PHP approach, but you will soon get used to it, and you will probably also come to like it a lot!

source..

http://asp.net-tutorials.com/basics/events/


Differences between Session and ViewStates?


in session timeout parameter needed for session bind to this time.....and it server side.


<sessionState
    mode="[Off|InProc|StateServer|SQLServer|Custom]"
    timeout="number of minutes"............

   ....../>


view state not any timing ,,,,its Clint side,,,,

.1) Session is for per user session. View State is for a page. ie. Storing data in a session variable will last till the session ends.

Whereas storing data in View State will last only till the page is in live.


2) Session is server type storage where as View State is client side type storage.


3) Session variables are stored in a Session State ItemCollection object that is exposed through the HttpContext.Session property. ViewState variables are stored in hidden fields.

4) When using a SessionState Mode other than Inproc, the session variable type must be either a primitive type or serializable. This is because the session-variable is stored in an external data store. There is no mode for ViewState. By default, serialization of data will be taken care by the viewstate.


ViewState in asp.net : basic concept of asp.net,use of ViewState,how to use ViewState,need of Cookies in asp.net application...


Another approach to saving data for the user, is the ViewState.

As described elsewhere in this tutorial, the ViewState allows ASP.NET to repopulate form fields on each postback to the server, making sure that a form is not automatically cleared when the user hits the submit button.

All this happens automatically, unless you turn it off, but you can actually use the ViewState for your own purposes as well. Please keep in mind though, that while cookies and sessions can be accessed from all your pages on your website, ViewState values are not carried between pages.

Here is a simple example of using the ViewState to carry values between postbacks:


<%@ Page Language="C#" AutoEventWireup="true"  CodeFile="Default.aspx.cs" Inherits="_Default" %>
<!DOCTYPE html PUBLIC "-//W3C//DTD XHTML 1.0 Transitional//EN" "http://www.w3.org/TR/xhtml1/DTD/xhtml1-transitional.dtd">
<html xmlns="http://www.w3.org/1999/xhtml" >
<head runat="server">
    <title>ViewState</title>
</head>
<body>
    <form id="form1" runat="server">
        <asp:TextBox runat="server" id="NameField" />
        <asp:Button runat="server" id="SubmitForm" onclick="SubmitForm_Click" text="Submit & set name" />
        <asp:Button runat="server" id="RefreshPage" text="Just submit" />
        <br /><br />
        Name retrieved from ViewState: <asp:Label runat="server" id="NameLabel" />
    </form> 
</body>
</html>

And the CodeBehind:

using System;
using System.Data;
using System.Web;

public partial class _Default : System.Web.UI.Page 
{
    protected void Page_Load(object sender, EventArgs e)
    {
        if(ViewState["NameOfUser"] != null)
            NameLabel.Text = ViewState["NameOfUser"].ToString();
        else
            NameLabel.Text = "Not set yet...";
    }

    protected void SubmitForm_Click(object sender, EventArgs e)
    {
        ViewState["NameOfUser"] = NameField.Text;
        NameLabel.Text = NameField.Text;
    }
}

Try running the project, enter your name in the textbox and press the first button.

The name will be saved in the ViewState and set to the Label as well.

No magic here at all. Now press the second button.

This one does nothing at all actually, it just posts back to the server. As you will notice, the NameLabel still contains the name, but so does the textbox. The first thing is because of us, while the textbox is maintained by ASP.NET it self.

Try deleting the value and pressing the second button again. You will see that the textbox is now cleared, but our name label keeps the name, because the value we saved to the ViewState is still there!

ViewState is pretty good for storing simple values for use in the form, but if you wish to save more complex data, and keep them from page to page, you should look into using cookies or sessions, as described in the previous chapters.

from...

http://asp.net-tutorials.com/state/viewstate/

Cookies in asp.net : basic concept of Sessions,use of Sessions,how to use Sessions,need of Sessions in asp.net application...


Sessions can be used to store even complex data for the user just like cookies. Actually,

sessions will use cookies to store the data, unless you explicitly tell it not to. Sessions can be used easily in ASP.NET with the Session object.

We will re-use the cookie example, and use sessions instead.

Keep in mind though, that sessions will expire after a certain amount of minutes, as configured in the web.config file. Markup code:

<%@ Page Language="C#" AutoEventWireup="true"  CodeFile="Default.aspx.cs" Inherits="_Default" %>
<!DOCTYPE html PUBLIC "-//W3C//DTD XHTML 1.0 Transitional//EN" "http://www.w3.org/TR/xhtml1/DTD/xhtml1-transitional.dtd">
<html xmlns="http://www.w3.org/1999/xhtml" >
<head runat="server">
    <title>Sessions</title>
</head>
<body runat="server" id="BodyTag">
    <form id="form1" runat="server">
    <asp:DropDownList runat="server" id="ColorSelector" autopostback="true" onselectedindexchanged="ColorSelector_IndexChanged">
        <asp:ListItem value="White" selected="True">Select color...</asp:ListItem>
        <asp:ListItem value="Red">Red</asp:ListItem>
        <asp:ListItem value="Green">Green</asp:ListItem>
        <asp:ListItem value="Blue">Blue</asp:ListItem>
    </asp:DropDownList>
    </form>
</body>
</html>


And here is the CodeBehind: 

using System;
using System.Data;
using System.Web;

public partial class _Default : System.Web.UI.Page 
{
    protected void Page_Load(object sender, EventArgs e)
    {
        if(Session["BackgroundColor"] != null)
        {
            ColorSelector.SelectedValue = Session["BackgroundColor"].ToString();
            BodyTag.Style["background-color"] = ColorSelector.SelectedValue;
        }
    }

    protected void ColorSelector_IndexChanged(object sender, EventArgs e)
    {
        BodyTag.Style["background-color"] = ColorSelector.SelectedValue;
        Session["BackgroundColor"] = ColorSelector.SelectedValue;
    }
}


As you can see, the example doesn't need a lot of changes to use sessions instead of cookies.

Please notice that session values are tied to an instance of your browser. If you close down the browser, the saved value(s) will usually be "lost".

Also, if the webserver recycles the aspnet_wp.exe process, sessions are lost, since they are saved in memory as well.

This can be avoided by saving session states on a separate StateServer or by saving to a SQL server, but that's beyond the scope of this article.

source..

http://asp.net-tutorials.com/state/sessions/

Cookies in asp.net : basic concept of Cookies,use of Cookies,how to use Cookies,need of Cookies in asp.net application...


Cookies are small pieces of text,

stored on the client's computer to be used only by

the website setting the cookies.

This allows webapplications to save information for the user, and then re-use it on each page if needed. Here is an example where we save a users choice of background
color:


<%@ Page Language="C#" AutoEventWireup="true"  CodeFile="Default.aspx.cs" Inherits="_Default" %>
<!DOCTYPE html PUBLIC "-//W3C//DTD XHTML 1.0 Transitional//EN" "http://www.w3.org/TR/xhtml1/DTD/xhtml1-transitional.dtd">
<html xmlns="http://www.w3.org/1999/xhtml" >
<head runat="server">
    <title>Cookies</title>
</head>
<body runat="server" id="BodyTag">
    <form id="form1" runat="server">
    <asp:DropDownList runat="server" id="ColorSelector" autopostback="true" onselectedindexchanged="ColorSelector_IndexChanged">
        <asp:ListItem value="White" selected="True">Select color...</asp:ListItem>
        <asp:ListItem value="Red">Red</asp:ListItem>
        <asp:ListItem value="Green">Green</asp:ListItem>
        <asp:ListItem value="Blue">Blue</asp:ListItem>
    </asp:DropDownList>
    </form>
</body>
</html>


The page simply contains a DropDownList control, which automatically posts back each time a new item is selected.

It has 3 different colors, besides the default one, which is simply white. Once a new item is selected, the ColorSelector_IndexChanged method is fired, from our CodeBehind file:

using System;
using System.Data;
using System.Web;

public partial class _Default : System.Web.UI.Page 
{
    protected void Page_Load(object sender, EventArgs e)
    {
        if(Request.Cookies["BackgroundColor"] != null)
        {
            ColorSelector.SelectedValue = Request.Cookies["BackgroundColor"].Value;
            BodyTag.Style["background-color"] = ColorSelector.SelectedValue;
        }
    }

    protected void ColorSelector_IndexChanged(object sender, EventArgs e)
    {
        BodyTag.Style["background-color"] = ColorSelector.SelectedValue;
        HttpCookie cookie = new HttpCookie("BackgroundColor");
        cookie.Value = ColorSelector.SelectedValue;
        cookie.Expires = DateTime.Now.AddHours(1);
        Response.SetCookie(cookie);
    }
}


Okay, two different parts to be explained here.

First, the Page_Load method, which is called on each page request. Here we check for a cookie to tell us which background color should be used.

If we find it, we set the value of our dropdown list to reflect this, as well as the background color of the page, simply by accessing the style attribute of the body tag.

Then we have the ColorSelector_IndexChanged method, which is called each time the user selects a new color.

Here we set the background color of the page, and then we create a cookie, to hold the value for us.

We allow it to expire after one hour, and then we set it by calling the SetCookie method on the Response object.

Try running the example, and set a color. Now close the browser, and start it up again. You will see that the choice of color is saved, and it will remain saved for an hour. However, nothing prevents you from saving the choice for much longer. Simply add a bigger value to the expiry date, or set an absolute value for it.


Tuesday, June 19, 2012

ASP.NET IIS Process :Beginner’s Guide,IIS Process Request responce,IIS cycle..,page life cycle in IIS


When request come from client to the server a lot of operation is performed before sending response to the client.

This is all about how IIS Process the request. Here I am not going to describe the Page Life Cycle and there events, this article is all about the operation of IIS Level.

Before we start with the actual details, let’s start from the beginning so that each and everyone understand it's details easily.

What is Web Server ?


When we run our ASP.NET Web Application from visual studio IDE, VS Integrated ASP.NET Engine is responsible to execute all kind of asp.net requests and responses. The process name is "WebDev.WebServer.Exe" which actually takw care of all request and response of an web application which is running from Visual Studio IDE.

Now, the name “Web Server” come into picture when we want to host the application on a centralized location and wanted to access from many locations. Web server is responsible for handle all the requests that are coming from clients, process them and provide the responses.


What is IIS ?

IIS (Internet Information Server) is one of the most powerful web servers from Microsoft that is used to host your ASP.NET Web application. IIS has it's own ASP.NET Process Engine to handle the ASP.NET request. So, when a request comes from client to server, IIS takes that request and process it and send response back to clients.


Request Processing :


Hope, till now it’s clear to you that what is Web server and IIS is and what is the use of them. Now let’s have a look how they do things internally. Before we move ahead, you have to know about two main concepts

1. Worker Process
2. Application Pool


Worker Process: Worker Process (w3wp.exe) runs the ASP.Net application in IIS. This process is responsible to manage all the request and response that are coming from client system. All the ASP.Net functionality runs under the scope of worker process. When a request comes to the server from a client worker process is responsible to generate the request and response. In a single word we can say worker process is the heart of ASP.NET Web Application which runs on IIS.

Application Pool: Application pool is the container of worker process. Application pools is used to separate sets of IIS worker processes that share the same configuration. Application pools enables a better security, reliability, and availability for any web application. The worker process serves as the process boundary that separates each application pool so that when one worker process or application is having an issue or recycles, other applications or worker processes are not affected. This makes sure that a particular web application doesn't not impact other web application as they they are configured into different application pools.


Application Pool with multiple worker process is called “Web Garden”.

Now, I have covered all the basic stuff like Web server, Application Pool, Worker process. Now let’s have look how IIS process the request when a new request comes up from client.

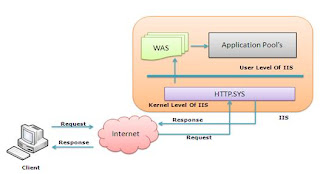
If we look into the IIS 6.0 Architecture, we can divided them into Two Layer


1. Kernel Mode
2. User Mode

Now, Kernel mode is introduced with IIS 6.0, which contains the HTTP.SYS. So whenever a request comes from Client to Server, it will hit HTTP.SYS First.


Now, HTTP.SYS is Responsible for pass the request to particular Application pool. Now here is one question, How HTTP.SYS comes to know where to send the request? This is not a random pickup. Whenever we creates a new Application Pool, the ID of the Application Pool is being generated and it’s registered with the HTTP.SYS. So whenever HTTP.SYS Received the request from any web application, it checks for the Application Pool and based on the application pool it send the request.


So, this was the first steps of IIS Request Processing.

Till now, Client Requested for some information and request came to the Kernel level of IIS means at HTTP.SYS. HTTP.SYS has been identified the name of the application pool where to send. Now, let’s see how this request moves from HTTP.SYS to Application Pool.

In User Level of IIS, we have Web Admin Services (WAS) which takes the request from HTTP.SYS and pass it to the respective application pool.


When Application pool receive the request, it simply pass the request to worker process (w3wp.exe) . The worker process “w3wp.exe” looks up the URL of the request in order to load the correct ISAPI extension. ISAPI extensions are the IIS way to handle requests for different resources. Once ASP.NET is installed, it installs its own ISAPI extension (aspnet_isapi.dll) and adds the mapping into IIS.

Note : Sometimes if we install IIS after installing asp.net, we need to register the extension with IIS using aspnet_regiis command.


When Worker process loads the aspnet_isapi.dll, it start an HTTPRuntime, which is the entry point of an application. HTTPRuntime is a class which calls the ProcessRequest method to start Processing.


When this methods called, a new instance of HTTPContext is been created. Which is accessible using HTTPContext.Current Properties. This object still remains alive during life time of object request. Using HttpContext.Current we can access some other objects like Request, Response, Session etc.


After that HttpRuntime load an HttpApplication object with the help of HttpApplicationFactory class.. Each and every request should pass through the corresponding HTTPModule to reach to HTTPHandler, this list of module are configured by the HTTPApplication.

Now, the concept comes called “HTTPPipeline”. It is called a pipeline because it contains a set of HttpModules ( For Both Web.config and Machine.config level) that intercept the request on its way to the HttpHandler. HTTPModules are classes that have access to the incoming request. We can also create our own HTTPModule if we need to handle anything during upcoming request and response.


HTTP Handlers are the endpoints in the HTTP pipeline. All request that are passing through the HTTPModule should reached to HTTPHandler. Then HTTP Handler generates the output for the requested resource. So, when we requesting for any aspx web pages, it returns the corresponding HTML output.

All the request now passes from httpModule to respective HTTPHandler then method and the ASP.NET Page life cycle starts. This ends the IIS Request processing and start the ASP.NET Page Lifecycle.


Conclusion

When client request for some information from a web server, request first reaches to HTTP.SYS of IIS. HTTP.SYS then send the request to respective Application Pool. Application Pool then forward the request to worker process to load the ISAPI Extension which will create an HTTPRuntime Object to Process the request via HTTPModule and HTTPHanlder. After that the ASP.NET Page LifeCycle events starts.

This was just overview of IIS Request Processing to let Beginner’s know how the request get processed in backend. If you want to learn in details please check the link for Reference and further Study section.